
Bathroom Snagging Checklist Before Final Handover
A Bathroom Fitter’s Snagging List: What Should Be Checked Before Handover?
The bathroom looks finished.
The tiles are clean, the shower screen is in place, the basin has been fitted and the building dust has gone.
That does not automatically mean the job is ready to sign off.
A professional handover should include more than standing in the doorway and deciding whether the room looks good. The finished bathroom needs to be inspected as a working room: water should flow correctly, fittings should feel secure, doors should move properly, finishes should be complete and small defects should be dealt with before they become everyday annoyances.
Think of the following as a practical snagging sheet for a newly completed bathroom refurbishment.
HANDOVER SHEET — Bathroom Installation
| Inspection area | Status | What you are looking for |
|---|---|---|
| General finish | □ Pass □ Check | No obvious damage, unfinished edges or missing components |
| Plumbing | □ Pass □ Check | No leaks; taps and valves operate correctly |
| Drainage | □ Pass □ Check | Water clears efficiently from basin, bath and shower |
| Tiling | □ Pass □ Check | Consistent joints, neat cuts and properly finished edges |
| Sanitaryware | □ Pass □ Check | Secure, aligned and correctly sealed where required |
| Furniture | □ Pass □ Check | Doors and drawers open smoothly and align properly |
| Electrical items | □ Pass □ Check | Lights, mirrors, extraction and other installed equipment operate |
| Silicone and finishing | □ Pass □ Check | Neat, complete joints without gaps or messy application |
Inspection Point 1 — Start With the Room Switched Off
Before testing anything, look at the bathroom in ordinary daylight if possible.
This is when you are most likely to notice alignment, damaged surfaces or details that disappear once decorative lighting is switched on.
Stand in several positions rather than inspecting everything from the doorway.
- Are cabinet doors sitting evenly?
- Does the mirror appear level?
- Are accessories positioned logically?
- Do tile cuts around visible areas look controlled?
- Are there scratches, chips or damaged finishes?
- Have all temporary protective films and labels been removed?
The point is not to search for microscopic imperfections. A bathroom is constructed by hand inside a real property, not manufactured as one seamless object.
What you are looking for are defects that make the finished work feel incomplete or could affect everyday use.
Inspection Point 2 — Run Every Tap
Now the bathroom stops being a visual inspection.
Turn on the basin taps, bath taps and shower. Test hot and cold operation rather than simply running each outlet for a few seconds.
While the water is flowing, inspect beneath the basin and around any visible connections.
Water should arrive smoothly, fittings should operate without excessive movement and there should be no signs of leaking around connections.
If the project includes concealed valves or wall-mounted brassware, operation should feel deliberate and secure. Loose handles, stiff controls or unusual movement are better raised at handover than accepted as something to “see how it goes”.
This is one reason a coordinated bathroom fitting and remodelling service matters: plumbing is part of the completed room, not a hidden subcontractor issue that becomes the homeowner’s problem afterwards.
Inspection Point 3 — Stop Watching the Water Arrive and Watch It Leave
Drainage deserves its own check.
Fill the basin partially and release it. Run the shower long enough for the floor or tray to become properly wet. If there is a bath, release a meaningful amount of water rather than a shallow splash.
The waste should clear efficiently without obvious backing-up or persistent pooling.
In a walk-in shower or wet-room arrangement, look particularly at where water travels.
Does it move towards the drain as intended? Does it remain within the showering area? Are there low points where water sits unnecessarily?
These observations tell you far more about the installation than staring at an unused shower tray.
TILING CHECK — Read the Room Like a Grid
Do not inspect bathroom tiles one by one.
Look at the pattern they create collectively.
| Look here | Check this |
|---|---|
| Main walls | Consistent grout widths and visually balanced setting-out |
| External corners | Neat edge treatment and clean trim work |
| Internal corners | Controlled junctions without messy grout or sealant |
| Shower controls | Accurate cuts hidden properly by fittings |
| Niches | Clean corners, sensible falls and aligned tile layout |
| Floor | No obviously proud edges or unstable tiles |
| Doorways and thresholds | Neat transitions to adjoining flooring |
A tiled bathroom should feel coherent rather than patched together around the fittings.
Pay particular attention to locations where several elements meet. A shower niche, for example, can involve tile edges, waterproofing, falls, grout, trim and sealing within a very small area.
Professional bathroom tiling and flooring is often easiest to judge at these junctions rather than in the middle of a large uninterrupted wall.
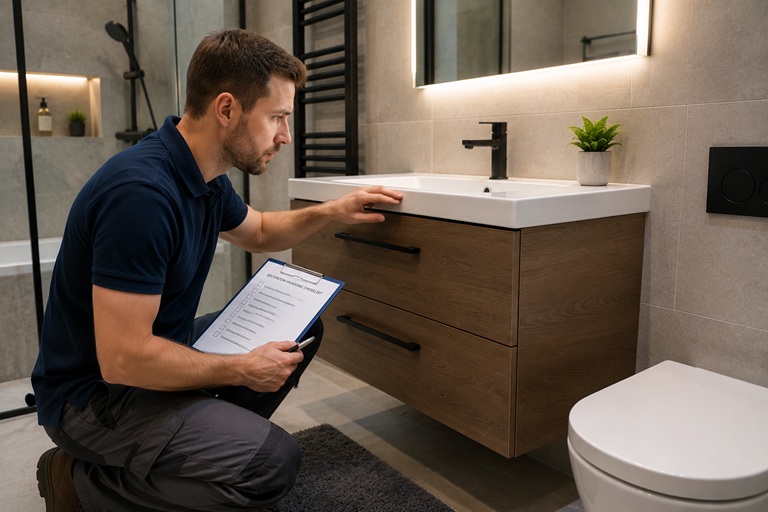
FIXTURE TEST — Touch Everything That Is Supposed to Stay Still
A finished bathroom contains surprisingly many objects attached to walls, floors and furniture.
They should feel secure.
- Gently check the basin for movement.
- Check whether the toilet feels secure under normal use.
- Open and close the shower screen or enclosure.
- Operate vanity drawers fully.
- Open mirrored cabinets and ordinary cupboard doors.
- Check towel rails, hooks and other fitted accessories.
- Make sure handles do not immediately loosen under normal operation.
This is not an invitation to pull on fittings aggressively.
The test is simply whether the bathroom behaves like a finished installation rather than a collection of components that have just been placed into position.
SEALANT CHECK — Follow the Silicone With Your Eyes
Silicone is one of the smallest visual details in the bathroom and one of the easiest to notice when poorly applied.
Follow the joints around the bath, shower tray, basin or other areas where sanitary fittings meet finished surfaces.
The bead should be continuous and reasonably consistent, without obvious gaps, excessive smearing or sections that appear to have been forgotten.
Pay particular attention to corners and changes in direction.
A beautifully tiled wall can still look unfinished if the final sealing work is rough.
ELECTRICAL CHECK — Now Turn the Room On
Once the physical installation has been inspected, test the items that rely on power.
- Switch on all bathroom lighting.
- Test illuminated mirrors if installed.
- Check extractor operation.
- Test underfloor heating controls where applicable.
- Check any other installed electrical bathroom equipment that forms part of the project.
Lighting should not flicker or expose fittings that were never properly finished around.
The extractor is particularly important because it is easy to overlook during a visual handover.
If extraction forms part of the refurbishment, confirm that it operates rather than assuming a new grille means everything behind it is working.
The 24-Hour Test
Some problems do not appear during the first ten minutes.
After the bathroom begins being used normally, keep an eye on a few things during the first day or two:
- unexpected moisture beneath furniture;
- slow drainage after longer showers;
- small leaks around wastes or traps;
- doors that catch once the room becomes humid;
- silicone joints that appear incomplete once wet;
- water escaping farther from the shower than expected.
This does not mean a newly completed bathroom should be approached with suspicion.
It simply recognises that a bathroom is a working installation and normal use is the final test of whether all the connected parts are behaving correctly.
FINAL SIGN-OFF
| Water tested | □ |
| Drainage tested | □ |
| Sanitaryware secure | □ |
| Furniture aligned | □ |
| Tiles and grout inspected | □ |
| Silicone inspected | □ |
| Lighting and extraction tested | □ |
| Bathroom cleaned and ready for use | □ |
A snagging list is not about finding reasons to criticise a completed refurbishment.
It is about making sure the work has genuinely reached the point where it can be called complete.
If you are planning a full bathroom renovation rather than inspecting one that is already finished, Bathroom Fitting Experts can handle the process from preparation and plumbing through to tiling, sanitaryware installation and final finishing. You can request a free bathroom fitting quote for a project in London and discuss the complete scope before work begins.