
Why Bathroom Waterproofing Matters Behind the Tiles
A bathroom can look flawless and still have a problem developing behind the surface.
The tiles may be perfectly aligned. The grout may look clean. The shower screen may sparkle. Yet none of those things tells you whether the layers beneath them were prepared properly.
This is what makes waterproofing unusual compared with most bathroom features: the better it is done, the less likely you are ever to see it.
To understand why it matters, imagine peeling a finished shower wall backwards, one layer at a time.
Layer One: The Tile
This is the part everyone notices.
Tiles define the colour, texture and visual character of the bathroom. They can make a room feel larger, calmer, warmer or more luxurious. They are also relatively durable and well suited to wet environments.
But tiles are not the entire waterproofing system.
Homeowners sometimes assume that once a wall is tiled, water simply cannot get through it. In reality, a tiled surface contains joints, corners, edges, penetrations and transitions where moisture needs to be managed properly.
The tile is therefore the visible finish, not the only line of defence.
This distinction is especially important in showers, around baths and anywhere that receives regular direct water exposure.
Layer Two: Grout and Joints
Between every tile is a network of grout lines.
The quality of those joints affects both the appearance and performance of the finished bathroom. Cracked grout, poorly filled joints or badly detailed corners can allow moisture to reach areas where it should not.
Movement matters too.
Buildings are not completely static. Surfaces can expand, contract and move slightly over time. This is why different types of junctions need to be treated appropriately rather than assuming every gap can simply be filled in the same way.
The most vulnerable areas are often not in the middle of a perfectly tiled wall. They are where materials meet.
Wall to floor. Wall to bath. Wall to shower tray. Internal corners. Pipe penetrations. Niches. Edges around concealed fittings.
These transitions deserve as much attention as the tiles themselves.
Layer Three: The Adhesive Beneath the Tile
Remove the tile and the next layer is usually the adhesive that bonds it to the prepared surface.
This layer does more than hold the decorative finish in place.
The adhesive needs to suit the tile, the substrate and the environment. Bathrooms expose surfaces to moisture, temperature changes and regular use, so preparation and material compatibility matter.
If the base is dusty, unstable, excessively uneven or otherwise unsuitable, the finished tiling can only be as reliable as what it has been attached to.
That is why professional bathroom tiling and flooring begins well before the first finished tile is placed on the wall.
Good tiling is partly visible craftsmanship and partly invisible preparation.
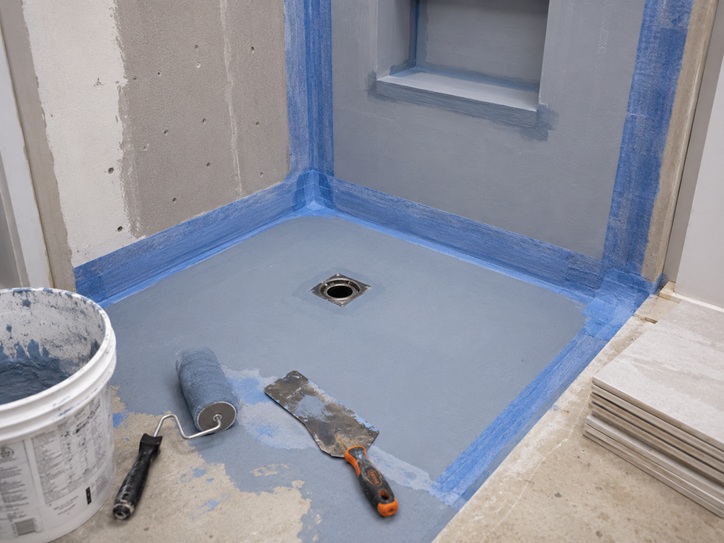
Layer Four: The Waterproofing System
This is the layer homeowners rarely see once the bathroom is complete.
In areas exposed to significant water, appropriate waterproofing or tanking can be applied before the decorative surface is installed.
The purpose is simple: if moisture gets past the outer finish, it should not be free to travel into vulnerable parts of the wall or floor.
Exactly what is required depends on the construction and the type of bathroom being created. A shower enclosure, wet room and lightly splashed wall do not all place the same demands on the surrounding structure.
This is where waterproofing stops being a product and becomes a system.
The membrane, corners, joints, penetrations and connection to the shower or floor all have to work together.
Applying waterproofing to the middle of a wall but neglecting the vulnerable junctions would miss the areas where water is most likely to cause trouble.
Layer Five: The Board, Wall or Floor Beneath It
Behind the waterproofing sits the actual substrate.
This could be a prepared wall, suitable board, screed, floor system or another construction depending on the property and bathroom design.
Its condition is crucial.
A waterproofing product cannot magically make a loose wall rigid. Nor can expensive tiles compensate for a floor that moves excessively under load.
This is why strip-out and surface assessment are such important parts of a full bathroom fitting and remodelling project.
Before anything is covered again, the installer has an opportunity to see whether the surface is sound enough to become part of the new bathroom.
If not, correcting it at this stage is far easier than discovering a problem after the room has been tiled and fitted.
Now Put the Layers Back Together
The structure makes more sense when you reverse the process.
A sound base supports the preparation. The preparation supports the waterproofing. The waterproofing protects the underlying structure. The adhesive holds the finish. The tiles, grout and seals form the visible surface you use every day.
None of these layers works in isolation.
This is why focusing entirely on the price or appearance of the tile can lead homeowners to underestimate the less exciting parts of the job.
A £100-per-square-metre tile does not make a bathroom more reliable if it is installed over a poor substrate with badly detailed wet areas.
Where Waterproofing Matters Most
Not every bathroom surface receives the same amount of water.
The wall behind a toilet experiences a very different environment from the wall inside a shower.
High-risk areas include shower enclosures, wet-room floors and walls, bath surrounds used for showering, recessed shower niches and junctions around trays and tubs.
These are places where water is not merely occasional. It can hit the surface repeatedly every day.
That repeated exposure is what makes correct preparation so important.
A bathroom may survive one small splash without issue. The challenge is handling thousands of showers over years of use.
The Shower Niche: A Small Feature With a Lot Going On
Recessed niches are a good example of why waterproofing details matter.
They look simple when finished: a neat shelf built into the wall for shampoo and shower products.
Behind the tiles, however, the niche creates several additional corners, edges and horizontal surfaces inside one of the wettest parts of the bathroom.
It must be formed accurately, integrated into the surrounding wall preparation and finished in a way that manages water rather than allowing it to collect where it should not.
This is a useful reminder that attractive bathroom features often have construction consequences invisible in the final photograph.
The Floor: Where Gravity Sends Everything
Walls receive splashes. Floors receive the result.
This becomes particularly important in wet rooms and level-access showers where the floor itself is part of the drainage strategy.
The surface needs the correct falls so water travels towards the waste rather than sitting in low spots or escaping towards the doorway.
Waterproofing also needs to connect properly with the drain and surrounding wall system.
This is why creating a wet room involves much more than removing the shower tray and tiling the entire floor.
It is a construction detail as much as a design choice.
What Can Poor Waterproofing Look Like Later?
The frustrating thing about hidden water problems is that they may take time to become obvious.
Possible warning signs can include persistent damp smells, stained surfaces outside the bathroom, loose tiles, swollen materials, cracked joints or repeated deterioration around wet areas.
By the time those symptoms become visible, the source may be behind a finished surface.
That can turn what might once have been a preparation detail into a repair involving tile removal, drying, substrate replacement and reinstatement.
This is why waterproofing is one of the least glamorous places to cut corners.
Why It Affects the Renovation Budget
When homeowners compare bathroom prices, visible products are easy to understand.
You can see the cost of a bath, tap or vanity unit.
Preparation products and waterproofing are less exciting because they disappear completely beneath the finished room.
But hidden materials and labour are still part of what you are paying for.
A quotation that includes proper preparation may therefore look different from one based mainly on fitting visible products over whatever already exists.
If you are comparing the wider cost of a project, the bathroom renovation cost guide explains how preparation, labour, tiling and specification can all influence the total.
The Best Waterproofing Is the Part You Forget About
Once the bathroom is finished, nobody wants to think about membranes, substrates or sealed corners.
You should be thinking about the shower, the lighting, the warm floor and whether you remembered to buy more shampoo.
That is exactly the point.
The hidden work exists so the visible bathroom can simply do its job.
Bathroom Fitting Experts can assess the existing room, prepare wet areas correctly and complete the tiling, plumbing and fitting required for a full bathroom refurbishment. If you are planning a renovation in London, you can request a free bathroom fitting quote to discuss the construction as well as the finished design.